Saturday, May 30, 2015

Holga HPL-P (Pinhole) for Pentax SLR?

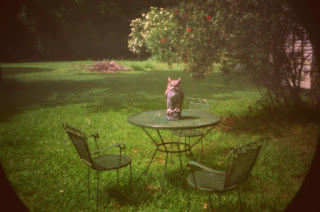
The Holga HPL-P is simply a pinhole mounted in a Pentax K-Mount lens barrel instead of an actual lens. The whole thing is plastic (like all things Holga) and looks very much like the Holga HL-P which is simply a plastic Holga lens mounted in a plastic K-Mount lens barrel.

As you can see from the image above there is a pronounced vignette effect in all four corners. This is the result of being designed for an APS-C crop frame digital sensor rather than the full frame negative of a 35mm SLR which is what I used to shoot this picture. Still, the image is not too shabby and does display the usual “look.” All I did in the way of post processing was brighten the colors of the scan up a little in Picasa.  

The greatest challenge to using this gadget (I really can’t call it a lens now can I?) was trying to see anything in the viewfinder of the SLR. It was mostly dark as a result of the tiny aperture. In spite of extensive research (even reading the instructions that came with the HPL-P) I was unable to find any definitive information on the thing except that it has a .25mm diameter pinhole. Based on that and some empirical data from the exposure values of the pictures taken I have estimated the aperture to be about f133.

The image above was taken using my Pentax ZX-L loaded with a roll of CVS 400 color film at a ½ second shutter speed.

Frankly, I am a little disappointed with this “pinhole lens.” I had hoped it could be used with a 35mm camera and that the image would be as good at least as my Home-made cardboard pinhole camera but I believe the pictures from the latter are much better than the former.


Next I will try it on a DSLR with a crop frame sensor and see what happens.
Sunday, May 17, 2015

Beacon 225

I love this picture! It reminds me of why I love Tri-X film. It reminds me of why I love photography and most of all it reminds me of why I love my wife.

I wanted a Beacon 225 camera for a long time. I really don’t know why. God (and everyone else) knows I have enough cameras already but there is just something special about this little gem.

Here’s a picture of the camera (below).
Manufactured by Whitehouse Products back in the 1950’s when I was a “wee lad,” this simple medium format camera is built like a tank and has that vintage aura that demands attention. It’s actually a pretty simple camera with only one aperture and one shutter speed so any exposure latitude you may need must come from changing the kind of film used or the lighting conditions of the subject. There is a really cool looking flash available for this camera but I don’t have one – yet!

It shoots 620 film which was obsolete until enterprising analog photography folks like Mike Razo at the Film Photography Project (FPP) started re-rolling 120 film onto 620 spools. That’s all 620 film is after all, 120 film on smaller spools.  The FPP store now carries nearly two dozen different film stocks in 620 and they even sell the 620 spools in case you want to roll your own!

Saturday, May 9, 2015

Light Meter App Works for Pinhole Cameras Too!


I generally use the meters in my cameras for determining the proper exposure settings. When shooting cameras without working on-board light meters I simply use one of my other cameras (with a working meter) to determine the correct exposure.

When I started shooting pinhole cameras (which do not have light meters) I continued to simply use another camera for metering, generally my Pentax K-1 mirrorless digital. Once the correct exposure settings were determined for the K-1, I used one of the Pinhole Camera Exposure Guides from MrPinhole.Com’s web site calculated and printed out specifically for the pinhole camera I happened to be using at the time.

For the first couple of rolls of film I bracketed every exposure but quickly realized that my method combined with the exposure guide from MrPinhole.Com was right on the mark every time. I can honestly say now that I have shot several rolls of film in three different pinhole cameras that all of my exposures have been technically perfect. Sometimes the composition is not what I hoped for but the exposures have been “right on” and I simply don’t bracket anymore.

As good as that is, I am always looking for better, faster, cheaper – you know the drill! So when I realized that there was an App for my Android smart phone that included a range of apertures from f1 to f2000 that claimed to work for pinholes as well as traditional cameras of all types I immediately checked it out.

Light Meter Tools by WBPhoto is a handy little app that appears to be exactly what it claims to be. I tested it against my way of determining exposures for my pinhole cameras and it was right on target but one stop off, every time. There is a handy provision to adjust the EV value to compensate for this and I have so I guess from now on I can leave the other camera and the exposure guide behind.

Lets face it, as much as I really enjoy pinhole photography, compared to more traditional photography, especially digital photography it’s a lot of work. Anything I can do to make pinhole photography simpler and easier means I will be that much more willing to do it and do it more often. This app does just that.

It may not seem like a big deal but with the pinhole camera, tripod, clipboard, notebook, pencil or pen in hand; being able to leave the extra camera behind (my cell phone is always on my belt anyway) is a great help.

Sunday, May 3, 2015

WPPD 2015

Well, Worldwide Pinhole Photography Day 2015 was April 26th and all the pinhole photos taken that day all around the world are slowly gathering together on the WPPD website (www.pinholdday.org) once again. This is always an exciting time of year for me. I come home each evening and review the pinhole photos posted that day.

The first day of course is almost all digital photos taken with a variety of digital cameras modified to take pinhole photographs. The second and third day you start seeing more and more photos as the momentum builds.  Many of these are shot on film and processed at home by the photographer.

As the first week comes to an end the film photos processed by local labs start to show up with increasing regularity and the digital photos start tapering off. The trend will continue until the end of the month, May 31, when the submittal period officially ends with the closing of the exhibition.

This year I shot with my Holga WPC on Kodak Ektar 100 color film. Although I generally prefer 400 (ISO) film and have most often used Portra 400 for WPPD, I really like the color palette of this film and as you can see from the photograph above I was rewarded with rich bright colors.

The Holga WPC is an interesting pinhole camera looking very much like a stretched Holga. It offers two formats; 6x9 and 6x12. The latter is considered ultra-wide or panoramic which costs extra to process and scan (at the Darkroom). This time I chose the 6x9 format and decided (again) that I really like it. I have an old Kodak Vigilant 620 folder that shoots 6x9 format and although I don’t shoot it much I recall now how much I liked the format whenever I have used it.  

I also used a light meter App on my Android phone this year called “Light Meter Tools” and it seemed to work pretty well. This will be the subject of a later post.

The photo above is the one I submitted to the WPPD website and I am pretty pleased with the results.  It shows my wife Mary & son Noah, hanging out on a bench at the Baton Rouge Botanical Gardens with his guitar. We visited there for WPPD and to do a photo shoot for Krista, my pregnant daughter-in-law. I really love all the bright colored flowers and the rich greenery. It makes a beautiful background for whatever you’re shooting. I had asked everyone to wear bright colors since I planned to include people in my pinhole photos for a change. As you can see my son Noah, ever the contrarian, showed up in black & white attire!

I rarely shoot people with pinhole because the exposures are usually rather long and people seem to have problems being still these days. The results are quite special when you can make it work however.

This 4 second exposure was taken with the camera on a tripod and the shutter held open with a rubber band. The lens cover was simply removed and replaced 4 seconds later. I have a cable release but sometimes prefer to use the old fashioned simplicity of a lens cap. Processing and scanning as noted earlier were done by The Darkroom.

My photo submission is #1760. Check it and a couple thousand others out (last year they had over 3500 photo submissions) on the WPPD web site.