Sunday, July 31, 2016

Cameras, cameras and more cameras!

You may have noticed that the last few blog posts have been all about new (to me) vintage cameras. I didn’t suddenly run out and buy a bunch of cameras to play with. The truth is I had gotten burned out on constantly trying out new cameras a year or so ago and just recently got over it.

I have actually had a couple of these cameras since last year but was not inspired to “play” with them until now.  When I am “testing” a new camera I am understandably more concerned with the camera than the photograph so the results of these shoots are interesting but not always inspiring. I tend to shoot the same subjects or images over and over again so I can compare the cameras capabilities to others I have shot with. If you have looked through my blog posts you will see that I have done a fair amount of that kind of thing but about a year ago I just got bored with shooting the same images all the time and decided to make the photograph, rather than the camera my focus. At that point I focused on just a couple cameras, mainly pinhole, and started trying to make photographs that made me feel like I had accomplished something of value.


I said all that to explain that after taking nearly a year to pursue my interest in photographs rather than cameras I can now enjoy playing with cameras again too and look forward to getting the film from these latest ones back so I can see the results and share them with you.

Sunday, July 17, 2016

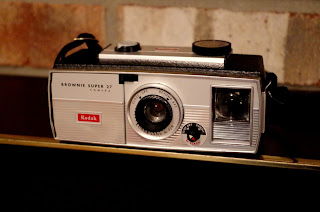
Brownie Super 27

What can I say about this little 1960’s jewel except it is “super!” This is a 60’s version of a Kodak box camera except like everything in the 1960’s it has a lot of extra “bells & whistles.”

This camera starts out with a clean sleek modern (in a vintage sort of way) design and a big bright (amazingly big & bright) viewfinder. The rotary shutter is working now just as crisply as it did nearly 60 years ago when it was new and has two speeds. 1/80th is the normal shutter speed but if you open the little door to expose the flash it changes to 1/30. 

Did I mention it has a built in flash? Yep, just open the little door that usually conceals it and pop in an AG-1 bulb (if you can find one). Oh, by the way you will have to also put in a couple AA batteries in the battery compartment on the bottom.

The aperture is also rather sophisticated for a box camera. The normal setting is f13.5 for bright sunny days but you can turn the little selector on the front to choose f8 when its cloudy. With the two apertures and two shutter speeds you have a total of four different exposure settings, and a flash! Not too shabby for a simple box camera.

The camera handled well and was a pleasure to shoot as I went through my first roll of 127 Rerapan black & white film. I haven’t found any AG-1 flash bulbs so everything was shot in daylight. The only complaint I had was that the shutter is pretty easy to press so that if you wind after each shot like I do the shutter is always cocked and it is a bit too easy to inadvertently press the shutter when you don’t intend to. I wasted one frame on the roll that way.


This 127 camera shoots in the square format yielding twelve shots. I can’t wait to see how they come out but if the way the camera looks and handles is any indication the pictures should be great!

Wednesday, July 13, 2016

Kodak Brownie Target Six-20

Thanks to my wonderful wife I now have a beautiful vintage box camera like the one my Mama shot all our family photos with back in the 1950’s when I was growing up. I have long wanted one and occasionally looked for one on line but my wife finally bought me one for an anniversary present.

The Kodak Brownie Target Six-20 shown above is about as simple a box camera as you could find but the utter simplicity combined with the super cool art deco face plate add up to one of the all-time classics. It of course shoots 620 film like so many of the old box cameras and the reliable rotary shutter has a single speed of about 1/30th of a second so keeping both camera and subject still during exposure is essential to good results.

There is a little tab next to the shutter that can be pulled out for “Bulb” setting which simply means that when this is done the shutter stays open as long as the shutter lever is depressed – not a great benefit for a camera without a tripod mount. Hand holding a camera for long exposures is generally not the way to get clear photographs.

The lens is a simple meniscus type with two apertures. The normal one is f11 but there is another pull out tab on top which slides a smaller f16 aperture in place for extra depth of field or for use with bright sunlit scenes.

The box is leatherette covered cardboard with a stamped sheet metal film frame and advance. There is the usual little red film counter window on the rear.

That’s it! In a sense it was the original Holga except with better optics and clearly much better build quality. I doubt we’ll be seeing too many Holgas still working 70 years from now. 


I shot a roll of Kodak Portra 400 with it already and should have the 8, 6x9 images back from The Darkroom soon. I will pick one or two of the best ones and post them here with a brief review of my experience with this lovely old camera.

Sunday, July 10, 2016

Rekkord!

My friend recently gave me this beautiful old camera but I have been unable to find out much about it so far. "Rekkord" right under the lens is the only marking except on the lens itself where it says "Luminere Anastigmat Nacor 1.6.3  F:135" From that and the little I have been able to glean I believe it is a French, pre-World War II era,  9 x 12 (approx. 3.5” x 4.75”) large format camera. My friend said his Dad brought it back from France where he served in WWII and it had been sitting in his garage with several film holders for years. It is in surprisingly good condition.


Although even my “go to” film lab, The Darkroom, doesn’t develop this size film I was able to find out that Freestyle Photographic actually carries some Fomapan 9x12 black & white film so I may just have to figure out how to process it myself. I have been trying to avoid darkroom work since the 1970’s when I decided I much preferred shooting pictures rather than processing or even post processing images. Still, using a change bag to transfer the film into a Patterson tank and process using the Taco method should be pretty simple. That and scanning a few images should take no more than an hour – not an overwhelming investment in time and effort for the pleasure of seeing how a 70 year old camera still works after all these years.

Stay tuned!

Saturday, June 25, 2016

Portraits by Moonlight

The moon has stood as a silent sentinel over the nocturnal affairs of man for thousands of years in its never ending dance around the sun with planet Earth. Every twenty-eight days it reaches opposition and reflects the full brunt of the sun’s light over the night. Although not nearly as bright as the sun, the light of the full moon has its own magic and is sufficiently brilliant to allow photographs to be made.

My first experience with photography and the moon came when I attempted to photograph the moon itself. Surprisingly, it did not require a long exposure at all. In fact (as I discovered) a good exposure of the moon can often be taken at f8 - f16 and shutter speeds of 1/30 to 1/100. It is only the night sky around the moon that is dark, not the moon itself.

When I decided to try to shoot portraits by the light of the moon, I was astounded to find almost nothing anywhere on the World Wide Web about it. Oh to be sure there were a few crazies out there like me who had dabbled in it and even someone with a few tips for capturing landscapes in moonlight, but I was shocked to find I might be the first to think portraits taken in the light of the moon might hold special allure. Try as I may I could find no information anywhere on the subject so I began as all pioneers do by heading out on my own.

After just a couple outings and maybe a dozen exposures I arrived at what I was looking for. The photograph above of my son Noah was shot with my Pentax K-S1 on “Auto” with a +4 overexposure set on the EV compensation wheel to end up with a 1 second exposure at f2.8 with the ISO @ 12,800 using the 40mm f2.8 Pancake lens. This lens is beautiful for portraits as well as other situations calling for a fast, short telephoto lens. The autofocus worked splendidly once I got the hang of “sighting-in” and focusing in the dark. I even tried “live view” to no avail but the focus assist light was just enough for me to compose and the camera’s AF to properly do its thing.

As you can see the image is not unlike a regular daylight photograph but there is “something different” and unique about the lighting that makes it easily distinguishable from similar daylight portraits that might be taken in the same spot. If you didn’t already know it was taken in the light of the full moon you probably would not identify it as such but you would immediately recognize that it was different and perhaps think it had been shot under some kind of special studio lighting.

This image was shot a couple days before the full moon. It is noteworthy that the amount of light varies greatly from day to day and increases 2% to 3% each day until it reaches full (100%) at the exact moment of the opposition or “full moon” so that this image was taken with only about 95% of the moon’s full lighting capacity. That may not seem to be a lot but over the course of a couple days it can easily mean a difference of a stop or more.


My immediate plans are to collect a gallery of these moonlight portraits to gain more experience and expertise and eventually to try to duplicate the work on film. That will of course be the ultimate challenge since there is no film available at ISO 12,800.

Sunday, June 5, 2016

On the Streets!

I don't do a lot of street photography anymore but when I do this is what it looks like. This was shot on Kodak Tri-X with the Pentax ZX-7 (my favorite black & white film and my favorite 35mm SLR) one rainy day while waiting in the car in the parking lot while my ran in the store to pick up something.

I just couldn't resist as these lovely ladies all decked out in their finest shopping attire strolled by in the rain. No raincoats, no umbrellas, and they didn't even speed up their saundering selves but just slowly sashayed by in utter defiance of the weather.

Street photography is a bit risky these day with folks seemingly so agitated much of the time. I've had women accuse me of trying to take photographs of their children (I wasn't at the time) like that was some kind of crime in and of itself. I can remember when people were flattered if you wanted to take their picture.

Wednesday, June 1, 2016

Speaking of Fire Hydrants!

Here is the other Worldwide Pinhole Photography Day (WPPD) shot that I am really happy with even though it was not the one I submitted to the WPPD gallery. Of course I have taken this same (or similar) shot of the fire hydrant in front of the old state capitol before with various cameras and films and even have some digital images of it but I think this may end up being my favorite.

This image was shot with the Holga Pinhole Camera on Kodak Portra 400 processed and scanned by The Darkroom. The exposure was 1 second and I had to get down in the gutter (literally) with the tripod to line up and take the shot.

The only way this gets better - maybe - is if I shoot it again with the Holga WPC on Ektar. Ektar is my favorite film for pinhole. Its almost like Kodak had pinhole in mind when they came up with that emulsion but unfortunately I was out of it when WPPD snuck up on me this year. The WPC will shoot a 6x9 or 6x12 negative meaning the image would be either 1.5 or 2 times wider than the 6x6 negative produced by the Holga PC. This could be a much cooler image or just one with a bunch of distractions on the periphery. In any case that will have to await my next film order to stock up on Ektar again.